codex-lv3-may-2025
Connecting Supabase to Your React App
Learn how to integrate your Supabase database with a React application to read and write data from your frontend.
Prerequisites:
- ✅ Completed Supabase Setup Guide
- ✅ Supabase project with a table and data
- ✅ React app created with Vite
Time Required: 20-30 minutes
What You’ll Learn
By the end of this guide, you’ll be able to:
- Install the Supabase JavaScript client
- Configure your React app with API credentials
- Fetch data from your Supabase table
- Display database data in your React components
- Create new records from React forms
Step 1: Get Your Supabase Connection Files
Supabase provides starter code to help you connect quickly!
Go to your Supabase project dashboard and click on the “Connect” tab in the left sidebar.
Show Me

What you’ll find:
- Starter code templates for different frameworks
- Pre-configured connection files
- Your project’s API credentials
Step 2: Select Your Project Framework Settings
In the Connect tab, select “React” or “JavaScript” as your framework.
Show Me
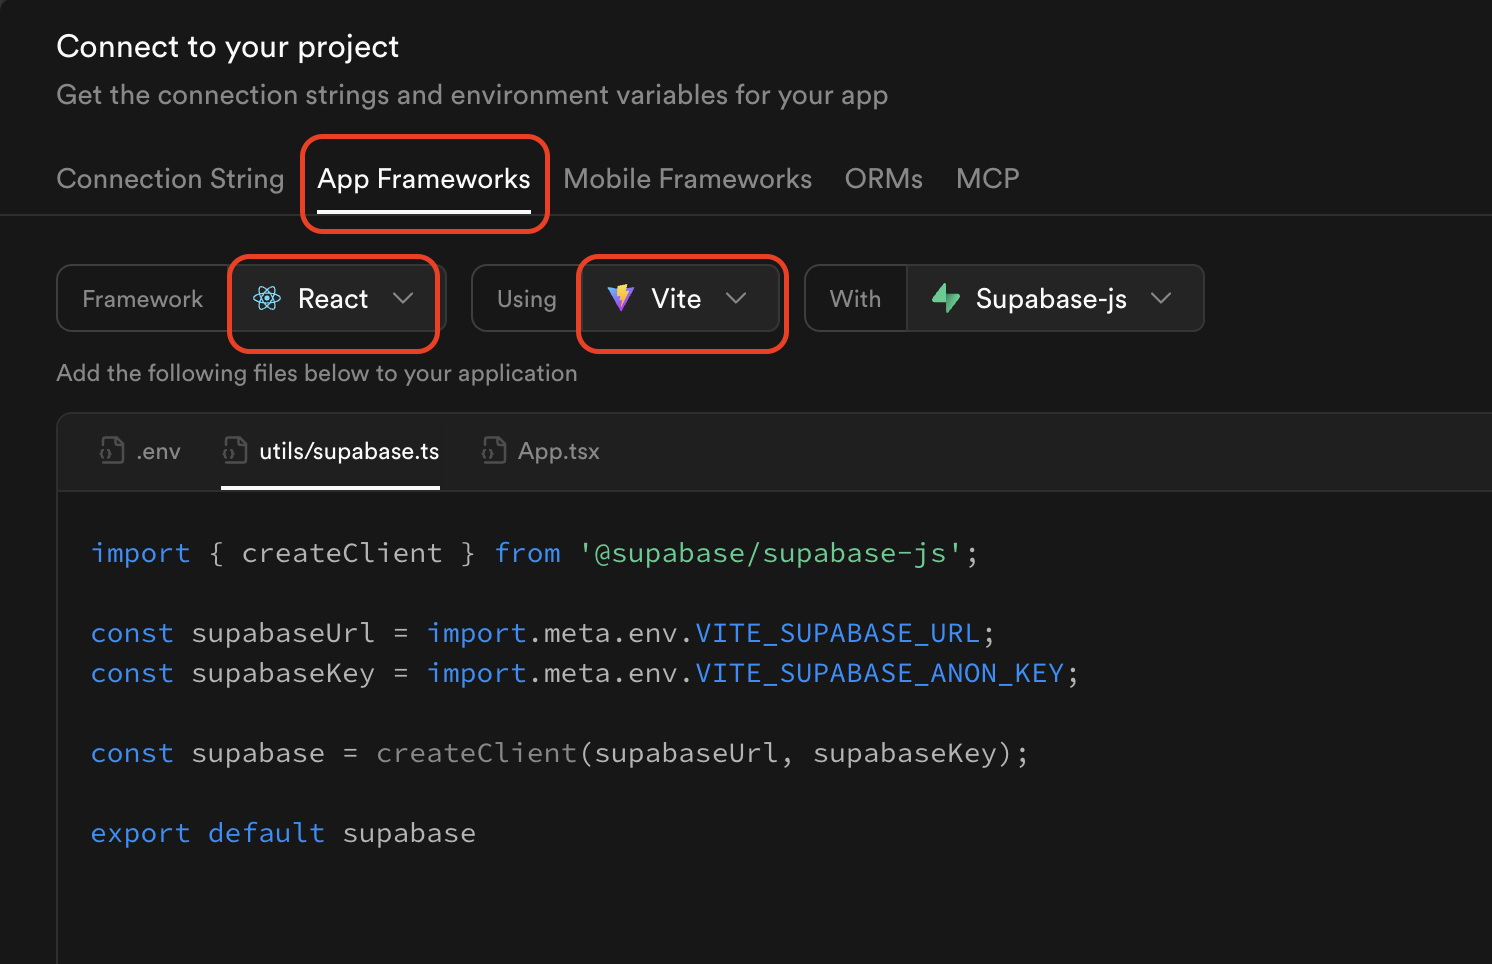
What happens:
- Supabase generates custom code for your project
- The code includes your unique API URL and keys
- Three files are provided: client configuration, data fetching, and page component
Note: You can choose TypeScript (.ts/.tsx) or JavaScript (.js/.jsx) - both work the same way!
Step 3: Copy the Three Starter Files
Supabase provides three files to get you started. Copy these into your React project.
Show Me
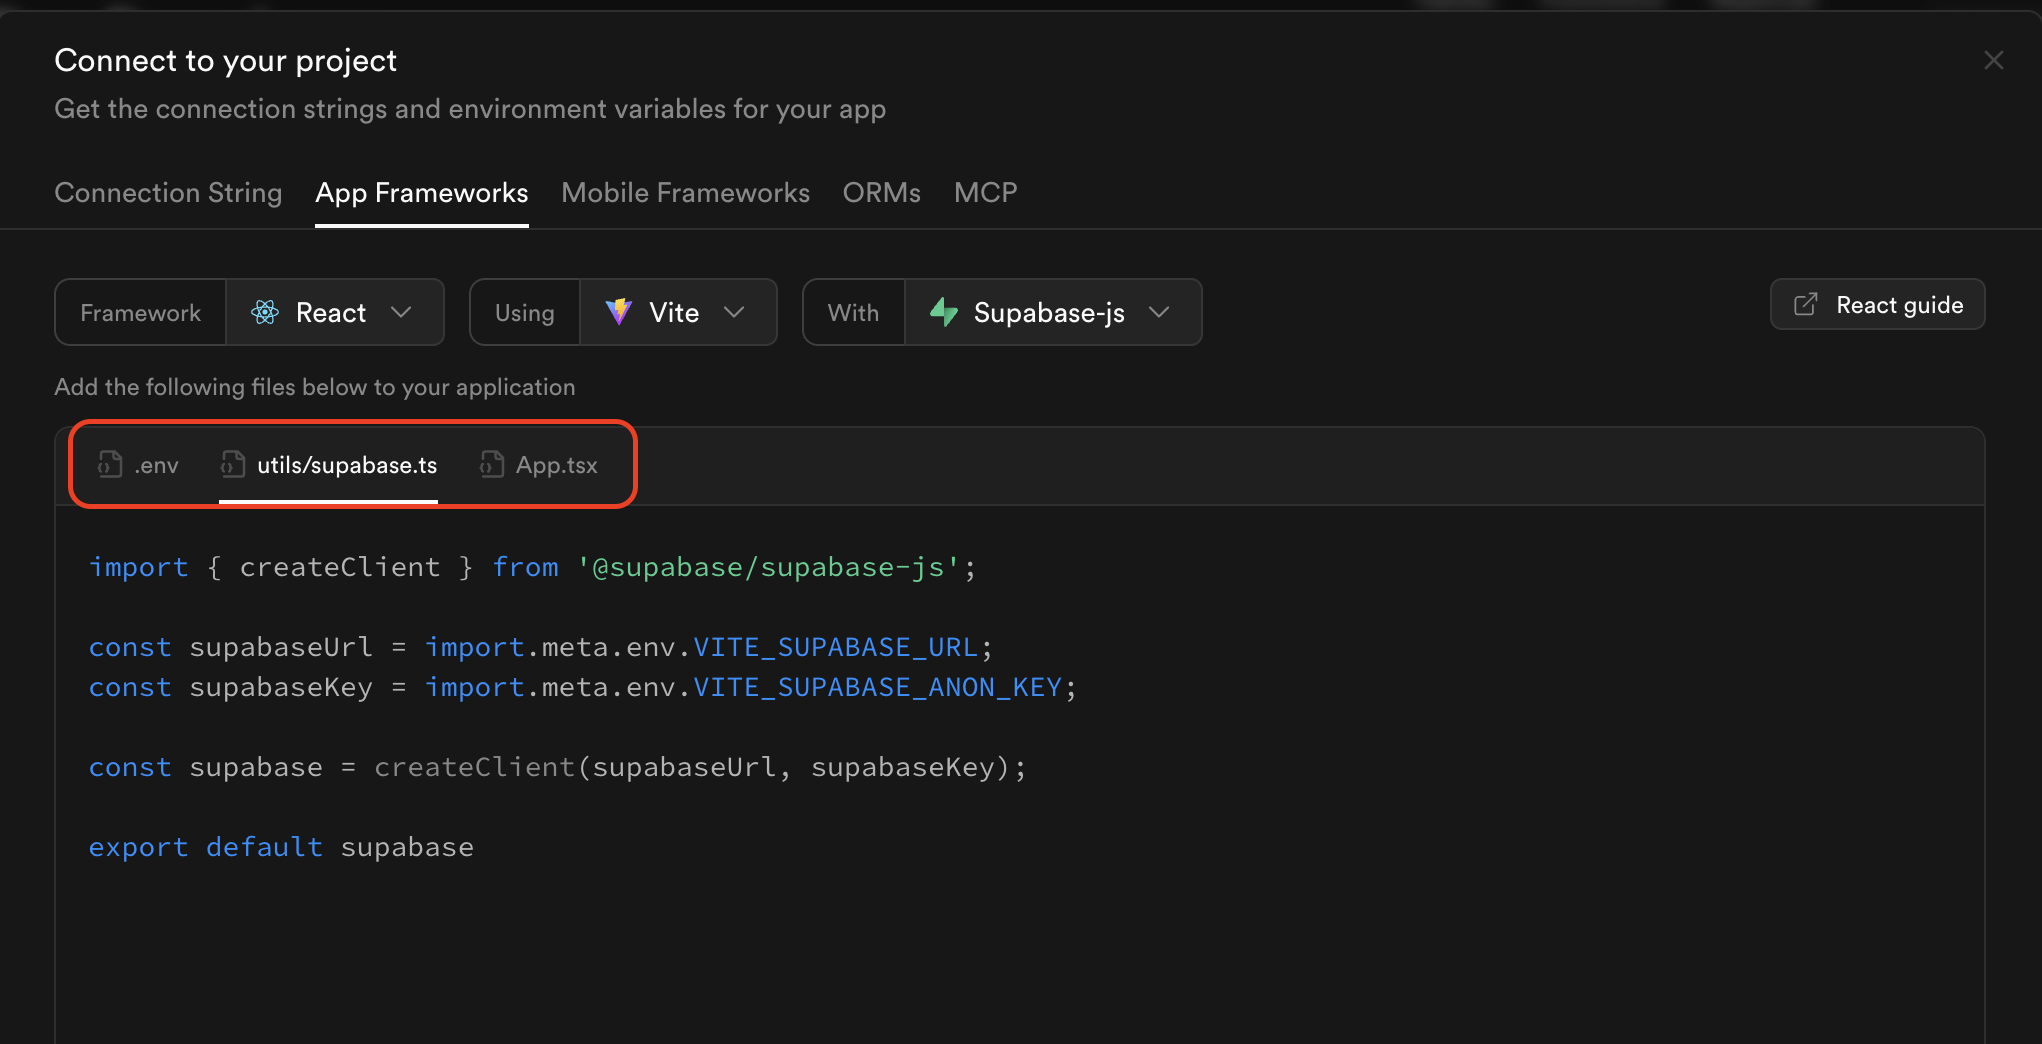
The three files you’ll need to modify:
.env.local- Environment variables file- Stores your Supabase URL and API key securely
- Keeps sensitive data out of your code
- Create in your project root:
.env.local
src/utils/supabase.js- Supabase client configuration- Creates connection to your database
- Uses environment variables for API credentials
- Copy to:
src/utils/supabase.js
src/App.jsx- Main React component- Shows how to fetch and display data from Supabase
- Demonstrates useState and useEffect with database
- Modify your existing App.jsx file
File Structure:
project-root/
├── .env.local           # Environment variables
├── src/
│   ├── utils/
│   │   └── supabase.js  # Supabase client config
│   └── App.jsx          # Main component (modified)
└── package.json
💡 Tip: Create the utils folder first: mkdir src/utils
How to set up:
- Create
.env.localfile in project root - Create
src/utils/supabase.jswith client config - Modify your existing
App.jsxto fetch data
Step 4: Customize for Your Table Schema
The starter code uses a generic “todos” table. Change it to match your table name and columns. We’ll use “employees” as an example.
Show Me
What to change:
- In
src/App.jsx:- Update the table name in your queries (e.g.,
'employees','products','students') - Update column names in the
.select()query - Update the variable names to match your data
- Change how you display the data in JSX
- Example:
item.task→item.first_namefor different column names
- Update the table name in your queries (e.g.,
Note: The src/utils/supabase.js file only contains the client configuration and doesn’t need table-specific changes.
Example:
Before (todos):
const { data, error } = await supabase
  .from('todos')
  .select('id, task, completed');
After (employees):
const { data, error } = await supabase
  .from('employees')
  .select('id, first_name, last_name, department');
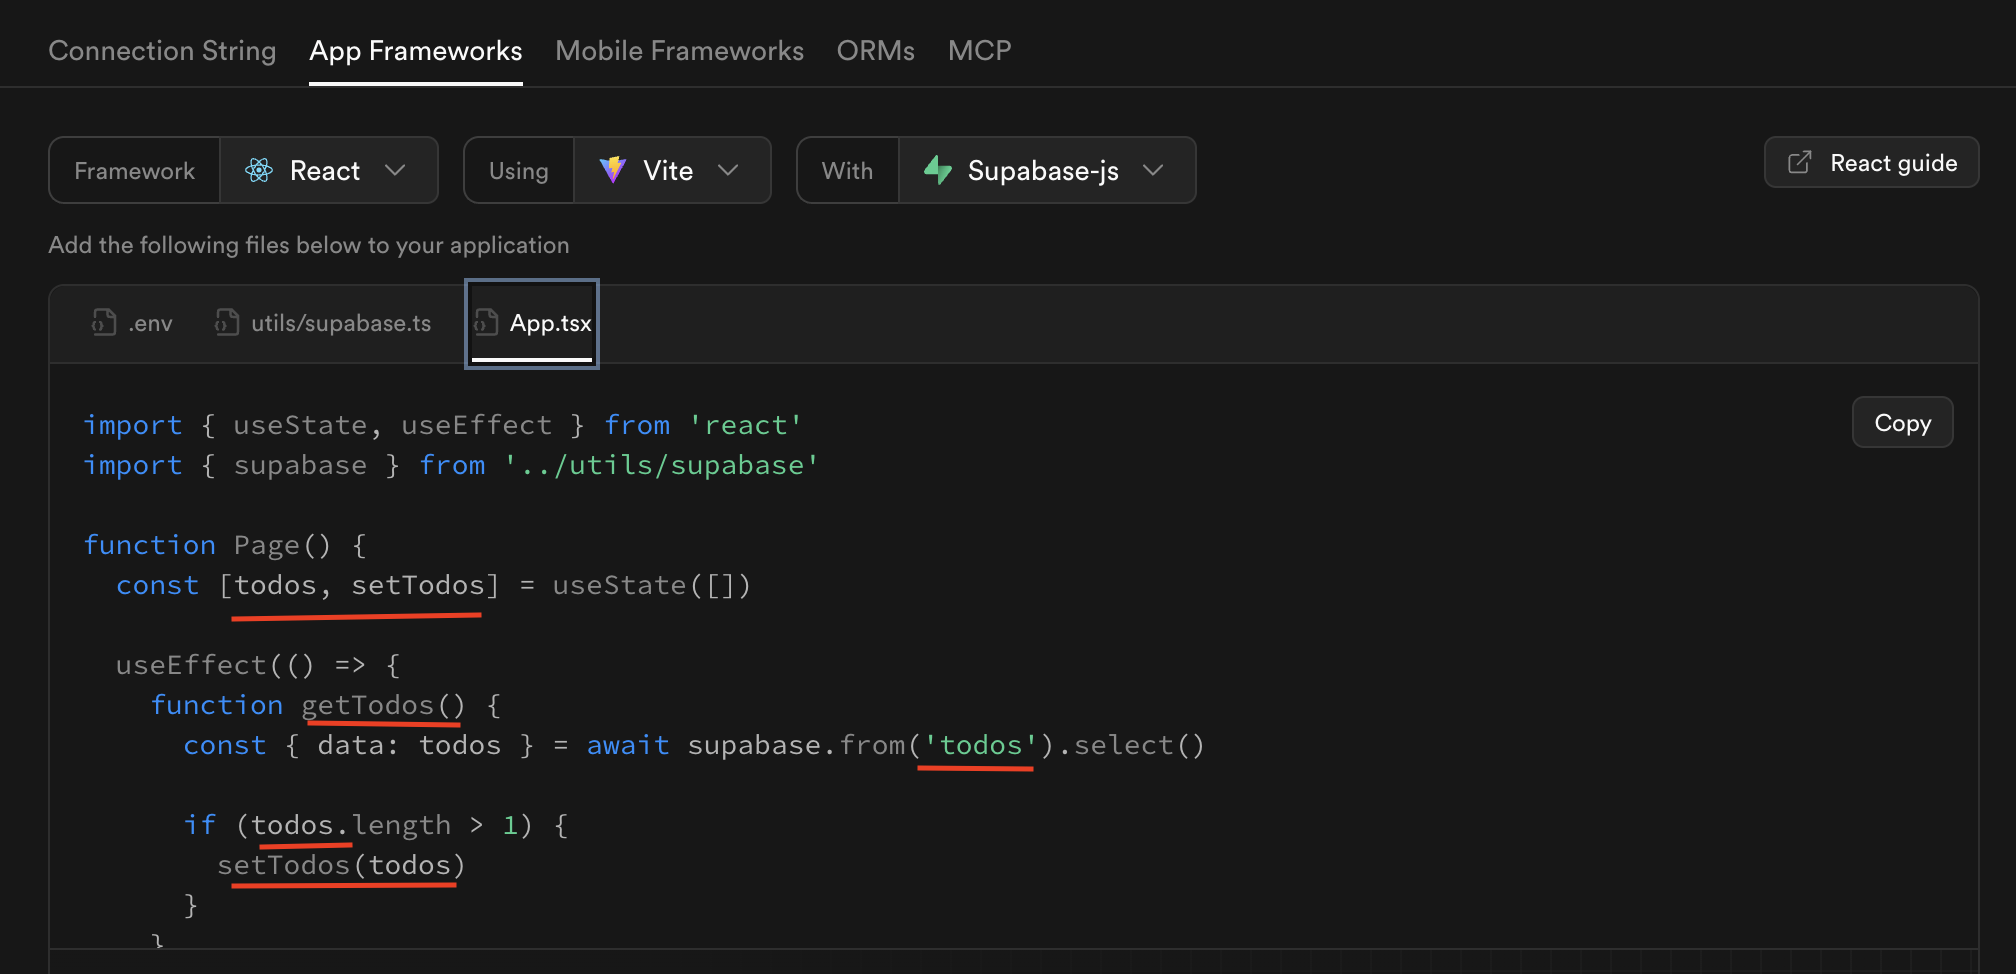
Step 5: Fix the Import Bug (Important!)
⚠️ Common Bug Alert! There’s a known issue in the Supabase starter code with the import statement.
Show Me
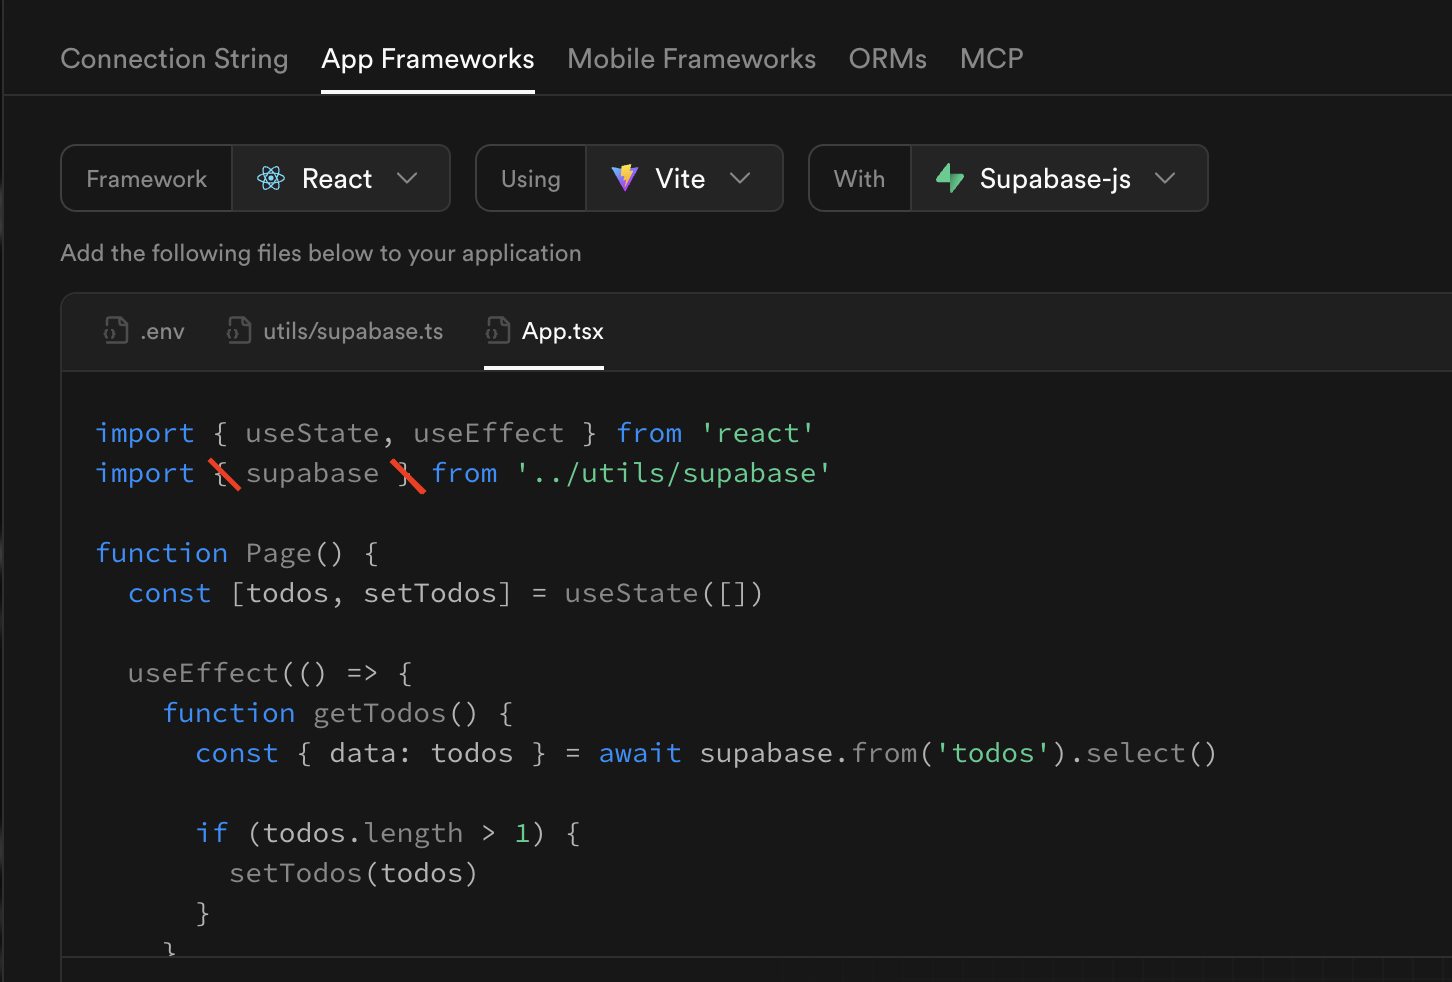
The Problem: The starter code uses a named import when it should use a default import, and has the wrong path.
Wrong (from starter code):
import { supabase } from '../utils/supabase'
Correct:
import supabase from './utils/supabase'
Where to fix:
- Check
src/utils/supabase.js - Check
src/App.jsx(or wherever you’re importing supabase) - Remove the curly braces
{ }aroundsupabase
💡 Why? The supabase.js file uses export default, so you need a default import, not a named import.
Fix 2: Add async to Functions Using await
The Problem:
Functions that use await must be declared as async. The starter code is missing the async keyword.
Wrong (from starter code):
function getTodos() {
  const { data: todos } = await supabase.from('todos').select()
  // ... rest of function
}
Correct:
async function getEmployees() {
  const { data: employees } = await supabase.from('employees').select()
  // ... rest of function
}
Where to fix:
- Any function that uses
awaitmust beasync - This includes functions in
App.jsxand any utility functions
Fix 3: Use .env.local for Better Security
The Problem:
The starter code creates a .env file, but .env.local is more secure.
Recommended change:
- Rename
.envto.env.local - This file is automatically ignored by git (better security)
Correct .env.local format:
VITE_SUPABASE_URL=https://your-project.supabase.co
VITE_SUPABASE_ANON_KEY=your-anon-key-here
Important:
- The
VITE_prefix is correct and required for Vite projects - Replace the placeholder values with your actual Supabase credentials
- Security Tip: Use
.env.localinstead of.env(automatically ignored by git) - Never commit
.envor.env.localfiles to version control
Step 7: Install Supabase Client Library
Before your code will work, you need to install the Supabase JavaScript client.
In your React project terminal:
npm install @supabase/supabase-js
If using JavaScript (not TypeScript), also install:
npm install tslib
What this does:
- Installs the Supabase JavaScript library
- Adds it to your
package.jsondependencies - Allows your code to communicate with Supabase
tslibis needed for JavaScript projects (not just TypeScript)
Verify installation:
- Check
package.jsonfor"@supabase/supabase-js"in dependencies - If you see it listed, you’re good to go!
Step 8: Test Your Connection
Now test that everything is working!
Steps:
- Start your dev server:
npm run dev - Import and use the data in App.jsx:
import { useState, useEffect } from 'react'; import supabase from './utils/supabase'; function App() { const [data, setData] = useState([]); useEffect(() => { async function fetchData() { const { data, error } = await supabase .from('employees') .select('*'); if (error) { console.error('Error:', error); } else { setData(data); } } fetchData(); }, []); return ( <div> <h1>Employee Directory</h1> {data.map((employee) => ( <div key={employee.id}> <p>{employee.first_name} {employee.last_name}</p> </div> ))} </div> ); } export default App; - Check your browser:
- Open http://localhost:5173
- You should see your data from Supabase!
- Check the console (F12) for any errors
Debugging:
- If you see errors, check the browser console
- Verify your API keys are correct in
supabase.js - Make sure table names and column names match exactly
- Check that RLS policies are enabled (from Setup Guide Step 10-11)
Common Patterns
Fetching All Data
// In your React component or utils file
async function getAllItems() {
  const { data, error } = await supabase
    .from('your_table_name')
    .select('*');  // * means all columns

  if (error) {
    console.error('Error fetching data:', error);
    return [];
  }

  return data;
}
Fetching Filtered Data
// Get items matching criteria
async function getEmployeesByDepartment() {
  const { data, error } = await supabase
    .from('employees')
    .select('*')
    .eq('department', 'Engineering');  // Only Engineering employees

  if (error) {
    console.error('Error:', error);
    return [];
  }

  return data;
}
Inserting New Data
// Create a new row
async function createEmployee(firstName, lastName, department) {
  const { data, error } = await supabase
    .from('employees')
    .insert([
      { first_name: firstName, last_name: lastName, department: department }
    ])
    .select();

  if (error) {
    console.error('Error creating employee:', error);
    return null;
  }

  return data;
}
Using in React Component
function EmployeeForm() {
  const [employees, setEmployees] = useState([]);

  async function handleSubmit(e) {
    e.preventDefault();

    // Get form data using event.target
    const formData = new FormData(e.target);
    const firstName = formData.get('firstName');
    const lastName = formData.get('lastName');
    const department = formData.get('department');

    // Create new employee
    const newEmployee = await createEmployee(firstName, lastName, department);

    // Refresh the list
    const { data } = await supabase
      .from('employees')
      .select('*');
    setEmployees(data);

    // Clear form
    e.target.reset();
  }

  return (
    <form onSubmit={handleSubmit}>
      <input
        name="firstName"
        placeholder="First Name..."
      />
      <input
        name="lastName"
        placeholder="Last Name..."
      />
      <input
        name="department"
        placeholder="Department..."
      />
      <button type="submit">Add Employee</button>
    </form>
  );
}
🆘 Troubleshooting
Issue: “Could not resolve ‘tslib’” error
Solution:
- This happens when
tslibis missing from your dependencies - Install tslib:
npm install tslib - Restart your dev server:
npm run dev
Example Error:
✘ [ERROR] Could not resolve "tslib"
node_modules/@supabase/storage-js/dist/module/lib/fetch.js:1:26:
1 │ import { __awaiter } from "tslib";
  ╵                           ~~~~~~~
Issue: “Outdated Optimize Dep” error after installing packages
Solution:
- This happens when Vite’s dependency cache is outdated
- Stop your dev server (Ctrl+C)
- Restart with:
npm run dev - The error should disappear on the next startup
Example Error:
GET http://localhost:5173/node_modules/.vite/deps/@supabase... net::ERR_ABORTED 504 (Outdated Optimize Dep)
Issue: “supabase is not defined”
Solution:
- Check that you installed:
npm install @supabase/supabase-js - Verify the import statement is correct (no curly braces)
- Make sure
utils/supabase.jsfile exists
Issue: No data showing / Empty array
Solution:
- Check browser console for errors
- Verify table name matches exactly (case-sensitive!)
- Confirm RLS policies are enabled (read policy required)
- Check that you have data in your table
- Verify API keys are correct in
supabase.js
Issue: Can’t insert data
Solution:
- Check that you have an INSERT policy enabled
- Verify required fields are included in insert statement
- Check column names match your table schema
- Look for error messages in console
Issue: CORS errors
Solution:
- This usually means API keys are wrong
- Go to Project Settings → API
- Copy the URL and anon key again
- Update in
utils/supabase.js
Issue: “Anonymous access is disabled”
Solution:
- You need to enable RLS policies
- Go back to Step 10-11 in the Setup Guide
- Create read and write policies
🎯 Key Concepts
Supabase Client:
- Created once in
utils/supabase.js - Imported wherever you need database access
- Handles authentication and requests
Async/Await:
- Database operations take time (network requests)
- Use
asyncfunctions andawaitfor results - Always handle errors with if statements
Query Methods:
.from('table')- Select which table.select('*')- Get all columns.select('id, name')- Get specific columns.insert([{ }])- Create new row.eq('column', value)- Filter where column equals value.order('column')- Sort results
Error Handling:
- Always check
errorin the response - Log errors to console for debugging
- Return sensible defaults (empty array, null) on errors
📚 Resources
Official Documentation:
Video Tutorials:
React Patterns:
🚀 Next Steps
Once you have data displaying:
- Add Create Functionality:
- Build a form to add new rows
- Use
.insert()to save data - Refresh the list after creating
- Add Update Functionality:
- Add edit buttons to items
- Use
.update()to modify rows - Show updated data immediately
- Add Delete Functionality:
- Add delete buttons
- Use
.delete()to remove rows - Update the list after deletion
- Explore Real-time:
- Subscribe to changes with
.on('INSERT') - Auto-update when data changes
- Build collaborative features
- Subscribe to changes with
✅ Success Checklist
You’ve successfully connected React to Supabase if you can:
- Install Supabase client without errors
- Import supabase client in your files
- Fetch data from your table
- Display data in your React components
- See your database data on the screen
- No console errors
💡 Best Practices
Organization:
- Keep Supabase functions in
src/utils/supabase.jsor similar file - Don’t put API keys directly in components
- Use environment variables for production apps
Error Handling:
- Always check for errors in responses
- Log errors to help with debugging
- Show user-friendly messages when things go wrong
Performance:
- Only select columns you need (not always
*) - Use filters to reduce data transferred
- Cache data in state when appropriate
Security:
- Never expose your
service_rolekey (only useanonkey) - Set up proper RLS policies before deploying
- Validate data before inserting
Congratulations! You can now build full-stack React applications with a real database! 🎉
Attribution: This guide was created with assistance from Claude AI (Anthropic) to provide clear, step-by-step instructions for connecting React to Supabase.